Vertex Addons Visibility Controls Documentation
Este conteúdo não está disponível em sua língua ainda.
The Visibility Controls extension (also known as Display Conditions) gives you the power to conditionally show or hide any Elementor widget or section. This means you can create content that is visible only to certain users - for example, show a special message to logged-in members, or hide a login form from users who are already logged in. It’s a great way to personalize your site content without needing any coding.
How to Use Visibility Controls
Section titled “How to Use Visibility Controls”-
Enable the Extension: Verify that Visibility Controls is activated in Vertex Addons > Extensions (it’s enabled by default).
-
Edit the Page with Elementor: Go to the page and open it in Elementor. Select the element (section, column, or widget) that you want to control visibility for.
-
Open Visibility Controls Settings: In the Elementor sidebar, go to the Advanced tab of the selected element. Look for Visibility Controls and expand it. (It might be towards the bottom of the Advanced tab settings.)
-
Enable Display Conditions: You’ll see a toggle labeled Display Conditions. Switch this to Yes to start setting up a condition. Once turned on, all the condition options will become available.
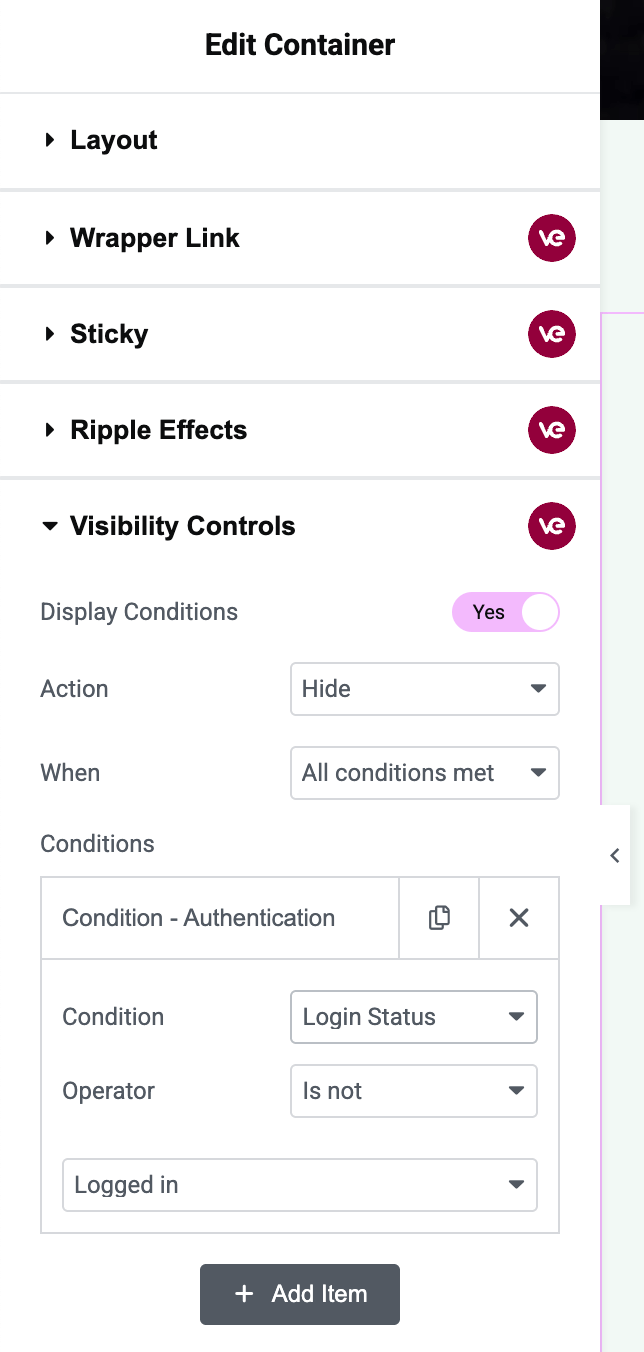 The image shows the Visibility Controls panel. “Display Conditions” is enabled. Options for Action (Show/Hide) and When (All conditions met/Any condition met) are visible, along with a list of conditions like Login Status is Logged in, User Role is Subscriber, etc.
 -
Choose an Action (Show or Hide): After enabling:
- Action: Decide whether you want to Show or Hide the element when conditions are met.
- Select Show if the element should appear only when the specified conditions are true. (If conditions aren’t met, the element will be hidden.)
- Select Hide if the element should be kept hidden when the conditions are true. (If conditions aren’t met, it will be visible as usual.)
- Think of it like this: “Show” means “show this element if X is true”, while “Hide” means “hide this element if X is true”.
- By default, it might be set to Show.
- Action: Decide whether you want to Show or Hide the element when conditions are met.
-
Choose When to Apply (All or Any conditions):
- There’s an option typically labeled When or Relation, with choices All conditions met or Any condition met.
- All conditions met (AND logic): The element will only pass the check if every condition you list is true. Use this if you set multiple conditions and want all of them simultaneously true to affect visibility. Example: User must be logged in and have Role = Editor (both true).
- Any condition met (OR logic): The element will pass if at least one of the conditions is true. Use this for a broader match. Example: Show element if user is logged in or on the homepage (either condition suffices).
-
Add Conditions: Now the fun part - specify your conditions. You can add one or multiple conditions in the list. Click Add Condition (the interface will provide a way to add items):
- Condition Type: First, choose a condition type from the dropdown. Common options include:
- Login Status - referred to as “Authentication” in the backend, this checks if the user is logged in or not.
- User Role - check the role of the logged-in user (Administrator, Editor, Subscriber, etc.).
- User - target specific user accounts.
- Page - check if the current page is Front Page, 404 page, Search results, or a specific page.
- Post - check if viewing a specific post or a post of a certain type.
- Once you select a condition type, additional fields will appear to define the condition:
- Operator (Is / Is Not): After choosing a condition type, set whether the element should be shown/hidden when the condition is true or is not true.
- “Is” means the condition needs to match.
- “Is not” means the condition should NOT match.
- Value: This field will change based on condition type:
- For Login Status, the value is typically “Logged in”. You don’t need to specify “Logged out” explicitly; you would use “is not Logged in” to mean logged-out users.
- For User Role, choose the role from the dropdown (Subscriber, Contributor, Author, etc.).
- For User, a user selector will let you search and pick one or multiple usernames. (Leave it blank to target all logged-in users for an “is” condition, as the description suggests.)
- For Page, select options like Front (homepage), 404, Search, or Custom Page. If you choose Custom Page, an additional field appears to enter a specific Page ID.
- For Post, you’ll likely get a field to select one or multiple posts, or even post types. For instance, you might search for specific post titles or select a post type like “Products” (depending on how the UI is structured, possibly it lists posts and also an “All” selection).
- Operator (Is / Is Not): After choosing a condition type, set whether the element should be shown/hidden when the condition is true or is not true.
- You can add multiple conditions by clicking “Add Condition” again for each one. Each condition row will have its own type, operator, and value.
- Condition Type: First, choose a condition type from the dropdown. Common options include:
-
Examples of Conditions Setup: (Just for clarity, here are a couple of scenarios)
- Example 1: Hide a Login Button for logged-in users:
- Action: Hide
- Condition: Login Status is Logged in.
- Relation: (if this is the only condition, All/Any doesn’t matter). This means if a user is logged in, the button will be hidden. If user is logged out, the condition is false and thus the button will be shown.
- Example 2: Show a “Welcome, VIP!” message to a specific user:
- Action: Show
- Condition: User is [select that specific username].
- Now only that user will see the message (when logged in). All others won’t meet the condition, so the message stays hidden for them.
- Example 3: Show an announcement only on the homepage to all visitors:
- Action: Show
- Condition: Page is Front.
- Anyone visiting the front page will see it. On other pages, it’s hidden.
- Example 4: Hide a section during maintenance from everyone except Admins:
- Action: Hide
- Add two conditions:
- User Role is not Administrator.
- Page is Front (assuming you only want to hide on the homepage, or pick another context as needed).
- Relation: Any conditions met. Actually, in this case to hide for non-admins, you could simply do Role is not Admin (and use Action Hide, Any = (only one condition so doesn’t matter)). We’re just illustrating possibilities.
- Example 1: Hide a Login Button for logged-in users:
-
Save and Test: Click Update to save the page after setting your conditions.
- Testing: Visit the page as different users or under different conditions to ensure it works.
- If you set a condition based on login status, try it while logged out vs. logged in.
- If based on user role or specific user, you’d need to log in as those roles/users to verify.
- For page conditions, navigate to the respective pages.
- When the condition is not met, the element will be completely absent on the page (it’s not just hidden with CSS; it’s not rendered at all). When the condition is met and your action dictates the element to show, it will be there.
- Testing: Visit the page as different users or under different conditions to ensure it works.
By using Visibility Controls, you can create dynamic content experiences. For instance, you can personalize a dashboard for logged-in members, show special promotions only to new visitors (if you had a way to detect that), or tailor content based on user roles (maybe display an “Edit Page” link to admins only). It’s a powerful feature to ensure the right content reaches the right audience on your site.