Vertex Addons Preloader Documentation
Esta página aún no está disponible en tu idioma.
The Preloader extension displays a loading animation overlay before your page content loads. This can make your site feel more polished by showing a spinner or loading graphic for a brief moment instead of a blank page, especially if some pages take a couple of seconds to fully render. A preloader can reassure visitors that the page is loading and enhance the perceived speed and user experience.
How to Configure Preloader
Section titled “How to Configure Preloader”-
Enable the Extension: Ensure Preloader is activated in Vertex Addons > Extensions in your WordPress dashboard (it’s on by default in Vertex Addons).
-
Open Elementor Site Settings: The Preloader settings are part of your global site settings. In Elementor, click the top-left menu icon and choose Site Settings. In the Site Settings sidebar, find Preloader in the list (look for the Vertex Addons section or the name “Preloader”).
-
Enable the Preloader: In the Preloader settings panel, you will see a control to select a Loader type or an option to enable the preloader.
- Set the loader option from None (which means no preloader) to an actual preloader style to turn it on. For example, choose Animation to use one of the built-in loading animations.
-
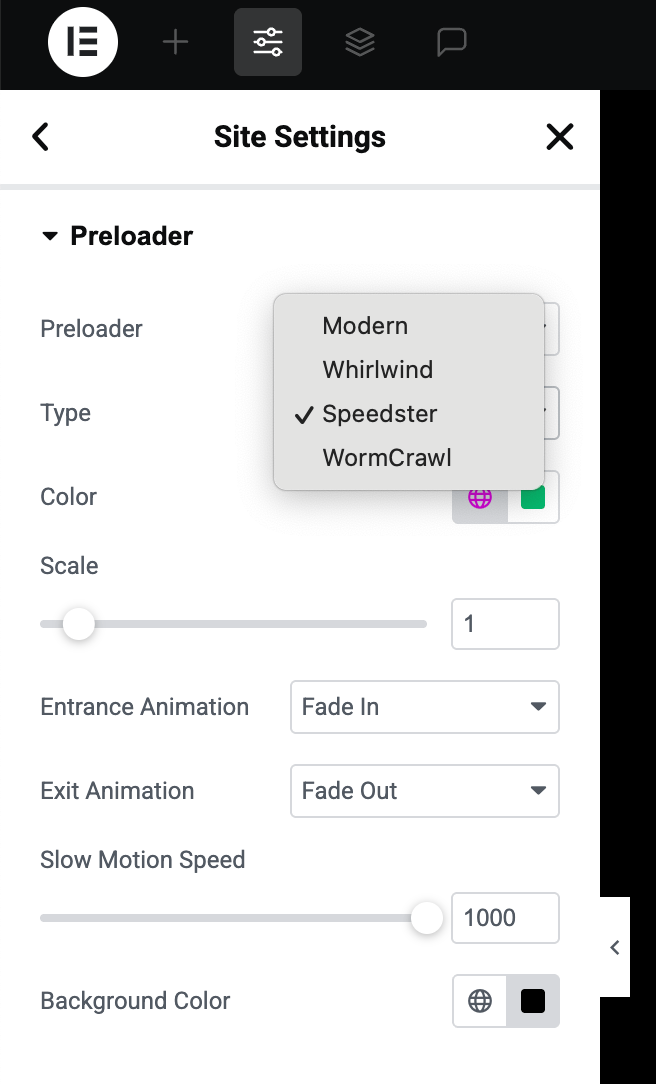
Choose a Preloader Style: If you selected an Animation type, you’ll have further options to pick the style of animation. Vertex Addons offers a variety of sleek loader animations:
- Modern: A series of bars bouncing (a classic loading bar animation).
- Whirlwind: A spinning circle with multiple rings (circular spinner).
- Speedster: A set of rotating lines forming a square-ish spinner.
- Worm Crawl: A creative worm-like dots animation.
- (Select the one that fits your site’s aesthetic. You can preview them by selecting each and watching the small preview, if provided.)
If the Preloader extension allows an Image option (to use a custom image or logo as a loader), you would choose Image and then upload/select your image. (In the free version, the focus is on built-in animations.)
 This image shows the Preloader configuration: a dropdown to select the loader type (e.g., Animation), a selection of animation styles (Modern, Whirlwind, etc.), and color settings for the background and loader.
 -
Customize Colors and Appearance: You can adjust the look of the preloader to match your branding:
- Background Color: This is the color of the overlay that covers the page while loading. By default, it might be white or black. You can change it to any color or even a semi-transparent color.
- Loader Color: If you chose an animation style, set the color for the loading graphic. For example, if you want the spinning circles or bars to be your brand color (say, blue), pick that color here.
- Size/Scale: Some loader animations might allow you to adjust the size. For instance, you could scale the loader up or down so it appears larger or smaller on the screen.
- These options ensure the preloader doesn’t look out of place on your site. For example, a dark-themed site might use a dark background with a light-colored spinner.
-
Entrance and Exit Animations: Decide how the preloader appears and disappears:
- Entrance Animation: This is how the preloader shows when the page starts loading. Common options are Fade In or Slide Down. Fade In will gently fade the loader overlay into view; Slide Down might drop it from the top. Choose the one you prefer, or “None” for an instant appearance.
- Exit Animation: This controls how the preloader goes away when your page is ready. Options might include Fade Out (smoothly disappear) or Slide Up. A fade-out is a subtle choice, while slide-up moves it off screen. Again, you can set “None” for it to just vanish immediately once done.
- Animation Duration: Here you set the timing (in milliseconds or seconds) for those entrance/exit animations. For example, 0.5-1 second is usually a good range. If you set 700ms (0.7s), a fade-out will last just under a second, which feels smooth.
-
Save Settings: Click Update or Publish in the Site Settings to save the preloader configuration.
-
Test the Preloader: Open your website in a new tab or window (you can use an incognito window to avoid any cached state). When you navigate to a page:
- The preloader overlay should appear immediately, showing your chosen animation (spinner or graphic) on the screen.
- Once the page’s content has loaded behind the scenes, the overlay will perform the exit animation (fade out or slide away) and then disappear, revealing your page content.
- Ideally, the preloader is only visible for a short moment - it’s there to cover any perceivable loading delay. If your site loads extremely fast, you might just see a very quick flash of it (or hardly at all). If your site load is a bit slower, the user sees the animation instead of a blank page.
The Preloader extension adds a nice touch of professionalism to your site’s loading experience. With the customization options, you can ensure it fits seamlessly with your site’s style and doesn’t feel jarring to the user.